Spring Boot 使用 SQL Server 验证用户登录
Spring Security API 封装了一套认证接口,如果没有特殊要求,只需要建一个表,写几行代码就完成了一个登录验证。
这是一个简单的例子,在 Spring Boot 中使用 Spring Security API 联合 SQL Server 验证用户登录。
目标
-
使用 Thymeleaf 模板创建一个自定义登录页面 /login
-
除 /hash/* 以外的页面都需要受登录保护
-
使用 SQL Server 数据库中 Users 表里的用户登录
相关技术和工具
- Java 8
- SQL Server 2017
- Spring Boot 2.3
- Maven 3.6
- Spring Tool Suite 4
数据库
在 SQL Server 中创建一个表。
CREATE TABLE [dbo].[Users] (
  [id] int  IDENTITY(1,1) NOT NULL,
  [username] varchar(30)  NOT NULL,
  [password] varchar(60) NOT NULL,
  [role] varchar(45) NOT NULL,
  [enabled] int DEFAULT NULL NULL
)
password 长度是 varchar(60) 是因为打算直接使用 Spring 中封装好的 BCrypt 哈希算法,这个算法 Hash 过的密码长度为 60 个字符。
添加一条数据
insert into users(username,password,role,enabled) values ('hooyes','$2a$10$TLMsNPhpOyLKYlkMVdo0SOs/7JQ2lp0KJu2XNsCm8QPzlqaTk7fCq','ROLE_USER',1)
以上数据表示用户名是 hooyes 密码是 hooyes.net
如何生成密码,下文会提到,其实就是 new BCryptPasswordEncoder().encode(password)
创建一个Spring Web项目
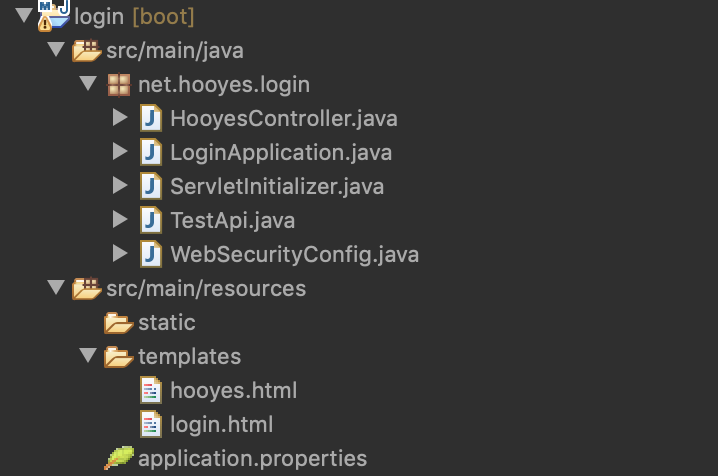
使用 Spring Tool Suite 创建一个 Spring Starter Project ,添加
- HooyesController.java
- WebSecurityConfig.java
- TestApi.java
- hooyes.html
- login.html
创建好的目录必要的结构:

其中 TestApi.java 以 Restful Api 的形式,给出了密码 Hash 的例子,以便本例测试。
application.properties
在 application.properties 中修改调试 server 的端口为7425,配置 Microsoft SQL Server 数据库地址。
server.port=7425
spring.datasource.url=jdbc:sqlserver://localhost:1433;databaseName=hooyesDB
spring.datasource.username=hooyes
spring.datasource.password=hooyes.net
pom.xml
在 pom.xml 中添加 MS SQL Server Driver 、Spring Web 、Spring Data JDBC 、Thymeleaf
以下仅列出本文关键的依赖项。
...
<dependency>
	<groupId>org.springframework.boot</groupId>
	<artifactId>spring-boot-starter-data-jdbc</artifactId>
</dependency>
<dependency>
	<groupId>org.springframework.boot</groupId>
	<artifactId>spring-boot-starter-web</artifactId>
</dependency>
<dependency>
	<groupId>com.microsoft.sqlserver</groupId>
	<artifactId>mssql-jdbc</artifactId>
	<scope>runtime</scope>
</dependency>
<dependency>
	<groupId>org.springframework.boot</groupId>
	<artifactId>spring-boot-starter-thymeleaf</artifactId>
</dependency>
...
为了保持页面整洁,以下的 Java 文件的 import 信息没有列出,请查看本文末提供的源代码。
HooyesController
package net.hooyes.login;

@Controller
public class HooyesController {
	@GetMapping("/")
    public String home() {
		return "hooyes";
	}

	@GetMapping("/login")
    public String login() {
		return "login";
	}
}
WebSecurityConfig
package net.hooyes.login;

@Configuration
@EnableWebSecurity
public class WebSecurityConfig extends WebSecurityConfigurerAdapter {
	@Autowired
	private DataSource ds;
    @Autowired
    public void configAuthentication(AuthenticationManagerBuilder auth) throws Exception {

        auth.jdbcAuthentication().passwordEncoder(new BCryptPasswordEncoder())
            .dataSource(ds)
            .usersByUsernameQuery("select username, password, enabled from users where username=?")
            .authoritiesByUsernameQuery("select username, role from users where username=?");
    }

	@Override
	protected void configure(HttpSecurity http) throws Exception {
		http.authorizeRequests()
		.antMatchers("/hash/*").permitAll()
		.anyRequest().authenticated()
		.and()
		.formLogin().loginPage("/login").permitAll()
        .and()
        .logout().permitAll();
	}
}
TestApi
package net.hooyes.login;
@RestController
public class TestApi {

	@GetMapping("/hash/{str}")
    public String hash(@PathVariable String str) {

		return new BCryptPasswordEncoder().encode(str);
	}
}
测试
1、在 Microsoft SQL Server 数据库中添加几条数据
insert into users(username,password,role,enabled) values ('hooyes','$2a$10$TLMsNPhpOyLKYlkMVdo0SOs/7JQ2lp0KJu2XNsCm8QPzlqaTk7fCq','ROLE_USER',1)
2、运行 Server
3、在浏览器中打开 http://localhost:7425/
提示登录,输入 hooyes / hooyes.net 登录成功
4、可使用 http://localhost:7425/hash/你的密码 Hash 你自己的密码
5、如果想布署到 Tomcat 中运行,命令行进入此项根目录,执行命令 mvn package 编译打包成功后,将 target 目录中的 .war 文件复制到 Tomcat 的 webapps 中即可。
源代码
这里是本篇文章完整的,完全可运行的源代码。
Online
https://github.com/hooyes/hooyes/tree/master/java/spring-login
Git
$ git clone https://github.com/hooyes/hooyes.git
$ cd hooyes/java/spring-login
$ welcome to hooyes.net
[INFO] ------------------------------o-
[INFO] Author : HOOYES
[INFO] Site : https://hooyes.net
[INFO] Page : https://hooyes.net/p/spring-boot-login
[INFO] Last build : 2025-03-23 14:57:07 +0000
[INFO] -0------------------------------